OME Suspension Upgrade FINISHED
Moderator: volvite


I'll get a bunch of pictures today and post. See if someone notices something I don't. I'm always up for having another set of eyes check it out.
Wow, those spacers give a ton of lift.
CT was frosty cold. But good nonetheless. Spent saturday morning outside trying to install a hitch on a friends 01 Pathy only to find out he didn't have the correct tool to massage it into place.
No info to report on the mileage because I took the Sentra. Wife wouldn't let us take the Murano up.
I'll be readjusting the suspension again today on the pathfinder to see if I can find out what is binding. It sounds horrible as there is some crunching like sounds then a pop as if metal rubs against metal chipping paint off, snags for a second then pops free. I'll be heading out in a moment.
Its fixed. I'll post some side shots in a few.
One of two things happened. I as I mentioned before, I failed to replace the dust guard on the drivers strut. I think that the small amount of distance the metal spacer at the top of the strut takes up was what caused my knocking/popping sound. I took the wheel off and back on 3 times, marking various components with compound, cleaning this and that, disconnected the sway bar, to see if I could change the sound or see where it was rubbing. Nothing. All of the lower components were fine so I directed my attention back to the strut its-self. I said I need to stop over thinking this and start from scratch. Disassembled the strut, verified everything was tight when taking it apart, replaced the dust cover, put it all back together, again, tightly. Replaced the strut. Tightened everything. Test drove. So far no noises. Normally starts happening right away.
The only other thing it could have been was maybe the strut plate nut was loose at the top of the strut, but I verified its tightness on vehicle and removing it wasn't exactly easy. So I'm going to say it was the space the dust cap occupied.
My fender gap is now measured at 6" for both front's and 6.25" and 6.5" for the passenger and drivers rear's respectively. I'll have to measure from the ground up today. I will post these numbers and my version of how I feel it now drives also.
hey blink. Small details make a big difference, eh?. Looking forward to those pics and your review on the rider. Just ordered my set today! I owe everyone here my experiences. I let you guys know when I get it started.
Questions: Can you post the droop differences? Also, I am still debating about going with 285/70R17 when I lift. Can you also give me an idea about the average MPG you are getting?
Thanks.
Questions: Can you post the droop differences? Also, I am still debating about going with 285/70R17 when I lift. Can you also give me an idea about the average MPG you are getting?
Thanks.
I'll get the full droop numbers probably tomorrow. The shocks/struts are the limiting factors on the droop and lift. I wish they were a bit longer to get more out of it.
I suggest not going with the 285/70's unless you want to trim your splash guards. Not a big deal but they will need to be shaved just a bit. I plan on doing mine soon. I thought the lift would give me some clearance but they are just a shade too big.
My MPG is garbage. Today was the first time in 3 weeks I have driven the path. I'll find a excuse to take a reasonably long trip in the path and pm you my results.
I don't have access to any good off-road places right now so I headed down to the town soccer/display field. Big dirt lot all nice and rutty. Flew down it at 20-30 banging into nice big potholes. Suspension just sucked them up and kept me level. I would have been bouncing around or heard nasty bangs with the stock setuo. So far it feels firmer on road as well, I like the feeling in turns holding more level with less body roll. But nothing harsh.
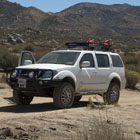
Sorry for the crappy side shot. I'll try to get a better one. I wasn't paying attention to the direction of the sun.

Front Lift Settled

Rear Lift Settled

I took my new measurements 3 times to ensure repetative results.
New height numbers:
Drivers Front 37 1/4" for a realized lift of 1 13/16"
Pax Front 36 15/16" for a realized lift of 1 13/16"
Drivers Rear 37 7/16" for a realized lift of 2 7/16"
Pax Rear 37 1/2" for a realized lift of 2 7/16"
Hitch 22 3/4" for a realized lift of 3 1/8"
Front Lift Settled
Rear Lift Settled
I took my new measurements 3 times to ensure repetative results.
New height numbers:
Drivers Front 37 1/4" for a realized lift of 1 13/16"
Pax Front 36 15/16" for a realized lift of 1 13/16"
Drivers Rear 37 7/16" for a realized lift of 2 7/16"
Pax Rear 37 1/2" for a realized lift of 2 7/16"
Hitch 22 3/4" for a realized lift of 3 1/8"
Excellent! I'd like to see a few more photos as well. The biggest question I have is if you noticed an increase in articulation, as the OME review article mentioned. That's the million dollar question. If there really is increased articulation, as in downward movement/travel, then it would be worth it.
I just took a look at that spring compressor you bought. A bit out of my price range for a 1 time use. If I end up doing this, it will definitely be done by a local shop.
I just took a look at that spring compressor you bought. A bit out of my price range for a 1 time use. If I end up doing this, it will definitely be done by a local shop.
Dammit Blink, now I have to go out and get one too...
Should have tested it on the local golf course
Just kidding it looks Great, I think I'll keep the tires at 31.5" try to save a little fuel... So I take it you are going to have to buy a hitch with a 3 or 4 " drop now to compensate for the lift? Now the question stands if you can squeeze some airlift bags as a safety mesure for towing, odds are the ones for the stock setup aren't long enough for the job.
Yea, if you can find one used or a good tool rental place its a lot cheaper. The only reason I purchased one is because I have done enough struts to warrant it. I found a 7200 model for $150 on Craigslist but it was missing one of the arms. But just make sure the shop line up the marks as I outlined here and your strut should pop right in.NVSteve wrote:I just took a look at that spring compressor you bought. A bit out of my price range for a 1 time use. If I end up doing this, it will definitely be done by a local shop.
You'll also find that "sweet" spot where when reinstalling the the reassembled strut you place it inbetween the tie rod end and lower link. Then you spin it so the lower spring perch rotates on the tie rod end until it gets to the lip that retains the spring, the top of the strut will then just barely have enough space to slip past the upper mount and then you can position and bolt in place.
I'm going to have to take some of my draw bars out and see which ones fit the best now. But I'm sure your right, I'll need some sort of drop bar.Fofiddy wrote: So I take it you are going to have to buy a hitch with a 3 or 4 " drop now to compensate for the lift? Now the question stands if you can squeeze some airlift bags as a safety mesure for towing, odds are the ones for the stock setup aren't long enough for the job.
I would also like air bags. Going to have to get in there and measure the distance and find a set to use as a custom app. Would be nice for extra added insurance.
Installation Tools Required/Nice to Have
Just a list of tools that I can remember that came in handy or were absolutely necessary.
Obviously jack and stands
Array of 14, 17, 19, 21 & 22mm sockets and wrenches.
Screwdriver/punch (handy to help align things)
Adj Wrench (to hold strut rod while tightening nut if doing yourself)
Strut spring compressor (thin finger type, not alternating bolt down type)
Bench vise (handy if disassembling stock struts)
Marking compound (mark the position of adjustment bolts to retain as much alignment as possible)
Well Blink, it was a rough start but you did it right in the end. Maybe after I get the Pathy from the wife, if she ever gives it up. We'll have to get together and install the lift on it. I work just down the road from you. I'm sure I'll probably see your Pathy around, it should stick out like a sore thumb with that lift.

Find Your Forum!