Moderator: volvite
From Autocarparts.com:NVSteve wrote:That looks pretty cool! Cost? Now you just need some red lights ala Knight Rider.


It looks sharp even without the grill inserts! I should've searched to see if anyone else had done this already.BMXPath wrote:Copycat!
Just kidding. Yours looks great. I did the same paintjob with my grill a couple of months ago. I kept the stock mesh and center logo on mine though. I sanded the chrome and had a buddy paint mine for me.
It was about $70 in materials... well, besides buying a used grill on EBAY. I wanted to have a spare grill so I didnt screw up the only one I had while experimenting.
Here are pics of mine.
Here is the topic I started...
http://thenissanpath.com/viewtopic.php?t=581
I like the Denali-style grill, but I think that's a bit too much bling for the front... it would look better if the inserts were black... just my opinion!Greybrick wrote:Nice effect GoBlue and great photos, here's similar from dundergrillz;
http://www.dundergrillz.com/gallery/cat ... p?cat_id=5
An option that I've been looking at though is to order the flatened expanded or perforated sheet metal pieces from a metal supply shop such as;
and cut to size.
.
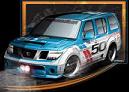
THAT sir, is sofaking awesome, it's now my wallpaper! Dual screens!goblue90 wrote:

Hahaha, thanks man. I'm pretty happy with the way it turned out!Marginjoey wrote:
THAT sir, is sofaking awesome, it's now my wallpaper! Dual screens!
I think I found my idol!
MGJ
Here's a writeup I posted on a couple frontier forums:Hayseed_40 wrote:what did you do to your headlights to get the yellow reflectors out?