painted grill?
Moderator: volvite
-
09pathinbk
- Posts: 63
- Joined: Thu Oct 27, 2011 9:01 am
- Location: brooklyn, NY
painted grill?
I've seen a few on here that have blacked out there grills, what is the best process to do this? type of paint top use, surface prep, etc.


-
NYPathfinder
- Posts: 290
- Joined: Fri Aug 13, 2010 9:53 am
-
FindyourPath
- Posts: 43
- Joined: Tue Nov 22, 2011 2:20 pm
- Location: Ft. Lauderdale, FL
there's about 6-8 pop out plugs across the top, with 2 or 3 behind the grill down low. just pull up on the little round bit in the center with a pair of needle nose pliers. also, 4 quarter-turn flathead square retainers in the front of the grille, 2 left side, 2 right. once you locate all the retainers, you can have the grille out in 5 minutes.FindyourPath wrote:whats involved with removing the grill??
seems like a lot of plastic connectors?
does anybody have a quick step-by-step?
thanks
-
IcedTeasley

- Posts: 178
- Joined: Fri Jul 31, 2009 10:00 pm
- Location: Lakewood, CO
I murdered-out my grill by removing the black plastic and chrome plastic grill assembly, cleaning the hell out of it, and sanding the chrome portion with 400 grit sand paper. I used flat black Rustoleum spray paint to cover it with three coats. I didn't put any kind of clear-coat on it. It hasn't come off in the carwash and hasn't been chipped by the winter gravel yet. If it does, I'll just touch it up with a biti more paint. Cheap, easy and so far so good. I'm sure there are way more thorough ways of doing it...
-
FindyourPath
- Posts: 43
- Joined: Tue Nov 22, 2011 2:20 pm
- Location: Ft. Lauderdale, FL
-
IcedTeasley
- Posts: 178
- Joined: Fri Jul 31, 2009 10:00 pm
- Location: Lakewood, CO
-
FindyourPath
- Posts: 43
- Joined: Tue Nov 22, 2011 2:20 pm
- Location: Ft. Lauderdale, FL
-
FindyourPath
- Posts: 43
- Joined: Tue Nov 22, 2011 2:20 pm
- Location: Ft. Lauderdale, FL
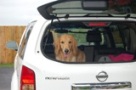
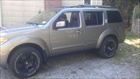
here is my my before and after. It was super easy, dog was very helpful.
http://photobucket.com/mypathfinder
Having the grille off facilitates the construction of a metal brace with 3 attachment points. You could use this to mount lights behind the grille.
http://photobucket.com/mypathfinder
Having the grille off facilitates the construction of a metal brace with 3 attachment points. You could use this to mount lights behind the grille.
Looks good. Definitely considering this and rim paint for my tan PF.FindyourPath wrote:here is my my before and after. It was super easy, dog was very helpful.
http://photobucket.com/mypathfinder
Having the grille off facilitates the construction of a metal brace with 3 attachment points. You could use this to mount lights behind the grille.

Find Your Forum!