[UPDATE - I pulled the motor and started the rebuilding pro-cess. Scroll down for more current info and epic sludge pics!]
Hey all,
It seems that our beloved 99 'Finder has a dead motor. About a year ago the oil light illuminated and the engine started ticking loudly so we immediately shut it off and had it towed to a shop. They said that the Oil Pressure Sending Unit was bad. They replaced it and the engine ran great for a year until a few days ago when the same exact symptoms occurred. I pulled over and turned it off. After letting it sit for a bit I turned it over and the light was off and he engine was smooth and quiet. I headed home and everything was ok until I was about to pull into the driveway. The light came on and the ticking started. I reached for the ignition hoping to turn it off and coast into the driveway, but it died before I could. I tried to start it (I was blocking traffic) and it wouldn't turn over. It just cranked very slow. I pushed it to the curb and let it sit for an hour then tried to start it again and it fired to life but it was ticking loudly so I immediately shut it down.
I had it towed to the shop and they called me and said simply that motor is toast. "It's not seized, but it's definitely dead." They provided no other information.
So, I think I'm going to pull the motor and rebuild it. But before I get into that, does anybody think the shop is possibly jumping to conclusions? Could the problem be less catastrophic than a cooked motor?
Thanks!
Tony
Bullet points
-1999 Pathfinder, Auto, 4x4
-motor = VG33E w/ 153,000 miles
-Oil is at the proper level
-I had valve cover gasket replaced about 20k miles ago and was told that I might eventually want to do something about the sludge eventually. I haven't addressed the issue.
-the shop that gave this weak diagnosis has been fantastic for years, but I realized after they called that it's under new management.
99 VG33E with 153K miles - DEAD - [UPDATE - Rebuilding!)
Moderator: volvite
99 VG33E with 153K miles - DEAD - [UPDATE - Rebuilding!)
Last edited by Teeter on Wed Jul 24, 2013 9:15 am, edited 1 time in total.
If the oil pressure switch failed and didn't warn you that there was an oil pressure problem then you are likely looking at a complete rebuild or replacement. Look on Ebay and you can find a decent low millage 3.3 for under 1000. I recently rebuilt my 3.3 for about 1100. but did all the work myself. Bored with oversize pistons, new bearings, crank did not need to be machined, new oil pump, water pump, heads rebuilt and resurfaced and all new seals and gaskets. I cringe at the thought of what it would have cost in labor.
Thanks for the replies!
Yes, I did check the oil level and it was fine.
I did some other tests and tried flushing the motor a bit. I ran it a few times briefly after changing the oil and filter and that process didnt help of course but it did highlight the root of the problem. I pulled the new filter off and it was bone dry. Clearly the oil pump isn't pumping oil through the motor. So, the pump is bad and the main bearing is probably spun.. Among other problems / damage.
So anyway I spent this past weekend preparing to pull the motor. I disconnected and carefully marked everything. It comes out this weekend. And I'll start the rebuild right away.
Do you recommend a rebuild kit or should I source the parts individually?
Judging by your description of the sludge under the valve covers, you may find that the oil pick-up strainer is partially plugged. In which case, you will be machining or replacing the crankshaft. If that is the case Personally I would go with the Ebay motor. First check the compression and oil pressure and bolt it in. replace the timing belt, water pump and seals, all the belts and hoses and you're good to go for another 150,000 miles.
The most daunting part of the engine removal is the wire harness. Take your time and disconnect the plugs without breaking any plastic. Fold the harnesses up against the windshield and tuck them out of the way under the windshield wipers. You will be amazed how easily everything goes back together. I have a manual tranny so, I was able to remove the drive shafts and with a transmission jack I could move the tranny back just far enough to pull the motor without disconnecting the shifter or any wire harnesses or removing the front differential. When I re-installed the motor I bought one of those oil filter re-locator kits and now the filter is just in back of the frame behind the power steering rams. Take plenty of pictures at every stage of the disassembly.
Got the motor out a couple weekends ago and the rebuild process has begun.
Look at this!!
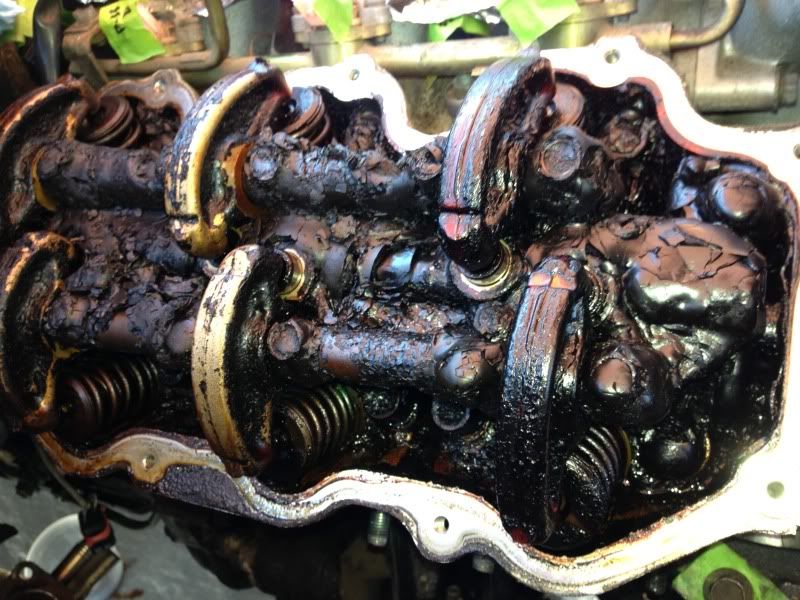
How was this thing running??
Things are looking better already..
I'm taking loads of pictures and copious notes. I hope to post a removal, rebuild and installation thread at some point. Or at least a list of tips, thoughts and potential pitfalls etc..
[/img]
Look at this!!
How was this thing running??
Things are looking better already..
I'm taking loads of pictures and copious notes. I hope to post a removal, rebuild and installation thread at some point. Or at least a list of tips, thoughts and potential pitfalls etc..
[/img]
-
ViperGTS19801
- Posts: 8
- Joined: Thu Jun 27, 2013 3:54 pm
Here's a teaser to keep you satiated until I get around to transcribing my notes:ViperGTS19801 wrote:I am following the shit out of this threat, my pathy is a 1998 and I might need to do this someday!! Looking forward to all the notes!!
#83 - Buy every weird extension and adapter that harbor freight sells. Dig deep into those pegboards and get the impact socket pieces also.. And a set of impact sockets.. Get it all. You end up needing so many weird, very specific 'reaches' pulling this motor. You'll walk out of HF only $40-50 lighter and you will save yourself a ton of hassle.
#15 - If, like me, you don't know what the hell you're doing under the hood, take your time and make sure you know what you're disconnecting. A face full of high pressure AC refrigerant will scare you and your family/neighbors. (I thought it was a coolant line..)
As noted on another thread, be sure to remove the crankshaft position sensor before attempting to pull the motor.
I agree about Harbor Freight.
One of the tools you will need is a set of metric allen wrenches that fit a ratchet and whatever torque wrench you will be using. The head bolts are allen head.
I agree about Harbor Freight.
One of the tools you will need is a set of metric allen wrenches that fit a ratchet and whatever torque wrench you will be using. The head bolts are allen head.
Good call. I got the nice set of 'long reach' socket hex keys. And they were ideal for the head bolts (once I found the head bolts under that nasty, baked on sludge.)Hooligan wrote: One of the tools you will need is a set of metric allen wrenches that fit a ratchet and whatever torque wrench you will be using. The head bolts are allen head.
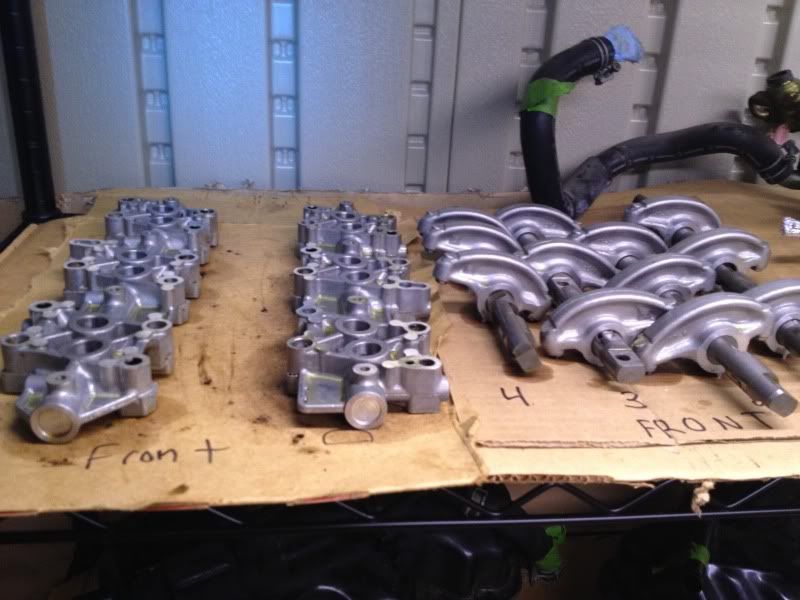
Update:
I'm currently rebuilding the lifters. Over half were seized and they are all (of course) full of sludge. I'm also trying to figure out the spring clips on the valve springs. I'm using a spring compressor, but the clips are being stubborn.
I wouldn't even bother with the valve springs if I were you. Just drop the heads off at a trusted machine shop and let them recondition them. They know what they're doing. Take the crank to them also to mike the journals although I'm pretty sure you will need to machine the journals for undersized bearings. When all is said and done I think you're going to wish you bought the used junkyard motor and just changed the timing belt.
For $500, you can get a set of remanufactured head from National Cylinder Head. Just take 'em out of the box and bolt them on!
http://nationalhead.com/
http://nationalhead.com/

Find Your Forum!